Saturday, May 27, 2006

Slow ahead

The weather, here in the UK is bloomin awful..... here in the Midlands we have had several inches of rain over the past weeks.....yet still "down south" there is a drought, despite this being a very , very wet May..

But..... as it rained..... again ! I only managed an hour gardening, then I was confined to "the workshop" work on my Robbe Atlantis Schooner :-)

The weather is far too damp, to attempt spraying the hull yet, so that will have to wait a while, probably after our annual holiday in a weeks time.

For today, I worked on fitting the forward bow support.....what a pain in the a** that is ! Took me hours to get it to fit.... and align the flanged nut under the forward deck-eye hole !

Can't really give you any advice, except, persevere, trim, try, trim, try and trim a bit more till it fits! Seems to me , the purpose of this part is only to provide support for that forward deck eye-bolt, and spread any loading it takes from the foresail.

I then fitted the 2 mast steps...as per the "destructions" and drilled the various holes in the deck "A" frames.... Whilst doing this, some parts came unstuck .. these A frames are only butt jointed with Ca.. so are not very strong. ( so needed re-gluing)

I have seen these replaced with aluminium on a German website....so this always an option.


Assembling the "legs /supports" for these A frames, involves, decapitating some 2mm bolts, so you are left with the threaded parts.. these are then inserted into brass sleeves and soldered with 7mm thread protruding in the flanged part and 4mm on the other end.

BE WARNED....... in my case, and admittedly, I have used thicker planks than the Robbe original ( 1.5 mm v Robbe 1.2mm ) the 7mm thread projection IS INSUFFICIENT to attach the nuts under the deck...

I had to reheat these parts and pull the threaded area out to about 10mm so I can screw the brass nuts on...

Thats about the sum of my full day "shed dwelling" today :)

BTW......
Still nothing received from Robbe, in respect of the few missing hardware parts identified earlier ...... maybe next week.....?

Thursday, May 25, 2006

4th Coat


This is a photo after the 4th coat of Tung oil, "massaged" into the Robbe Atlantis timber deck.

The oil has really brought out the grain and a warm appearance to the fine timbers.

Each application, the wood is absorbing less..... I reckon 5- 6 coats and it will reach maximum saturation... so I added coat no 5 this evening.

Once complete, she should only need a wipe with an oiled cloth to keep her looking good.

I certainly am very pleased with the end result :)

Radio Arrival


Well, after yesterdays Genoa Sail no show, my radio gear has arrived.
Seemed to be good value to me, and the highest specification for the price.

I have gone for the Futaba 6 EX PCM 40 meg FM set...


Ready fitted with a ratchet on the left stick , which is ideal for sheet control.. it has 6 channels.. my theory was.......
1) main sheet
2) rudder
3)Aux motor
4) Genoa winch ( if I do decide to have one)
5) Genoa motor ditto
6) Lights

I am also happy it is the first " multi model memory" set I have owned.. in theory one can set different models up ( only another rx and xstal required) store all the settings, including trims and servo reversing, and with just a few buttons.

Personally I also like to see the remaining battery voltage...... this is a digital readout, with an alarm when level falls too low.

Leds for power information just don't do it for me :)


Wednesday, May 24, 2006

Oops

Let down by my supplier...... waited in expecting the Robbe Atlantis Genoa delivery, nothing came...
Chased supplier, told the importer hasn't got it in stock......delay of several weeks.

I have now cancelled the order, for three reasons..

1) they took the payment in full and promised delivery
2) they charged me for 48 hour delivery of an item they hadn't got !
3) I only found out because I chased them !

On principle, this is not good customer service or practice, so I shall take my business elsewhere, and have asked for a full refund.

Regrettably, there appears to be fewer and fewer reliable UK outlets these days.....

I shall use the delay time as thinking time and revisit my decision on the Genoa.

Saturday, May 20, 2006

The Obvious

Is sometimes, under ones nose, and we cannot see it !!
Yesterday, I hunted, high and low thro the parts bag for some tiny csk screws, with which to attach the bulwarks, temporarily..

They didnt quite match the description in the parts.... so I asked a few aquaintances, who have built / or are building the same Robbe Atlantis Schooner.

It seems, I had selected the right ones for the job. Tiny slot head csk screws.

Then Colin H, suggested I spend a couple of hours "sorting" all the remaining hardware, into the relevant sections of the build, re-package and number them !!

SO OBVIOUS........... I DIDN'T SEE IT !!

So for a couple of hours today, thats what I did.... simply plough through the parts list , referring to the plan..... and sort em !!

Good job I did too..... I have found several small parts missing from the kit..... ringscrews, washers, nuts etc.. 8 pieces in total.. but all essential for the build.

Needless to say.. I have emailed Robbe, with the discrepencies.. and am confident they will make good the problem.

Quite honestly, I am not suprised, this Robbe Atlantis is a huge kit, with hundreds of parts... and is quite an old kit.....as all the parts are simply inside multiple plastic bags, that are not numbered in anyway ( unlike recent /current Robbe kits) The bags do not specifically relate to a building stage.. parts ARE mixed.

I would advise ANYONE who gets a kit, to do this "sorting" excercise... BEFORE you start the BUILD !!

Thanks for the tip Colin :)

Colin also informed me, that I would find numerous discrepencies in the parts, again he was correct.. many items are listed as steel, but the parts are brass...... and indeed vice -versa. Certainly adds to the challenge Robbe !

Of particular note, is the anchor 22.13 ..... quoted as brass.... but its plastic !


Third Coat

Today saw the third coat of Tung Oil massaged onto the deck timbers of my Robbe Atlantis. This is the first undiluted coat, it is much thicker than the previous two layers, which were diluted with 50% white spirit.

As per the instructions, the oil was left to soak in for 15 minutes..... before the excess was wiped off with a clean cloth.
(This part is important, as if it were left, it would become sticky and prevent further penetration into the wood )


I have also made a start on the bulwarks.... oh what fun they are !!

Remember...... ( I Didn't !! ) there is a left and right....... side to trim to the 45 degree bow angle... Fortunately.. there is enough length to allow one c*ck up ! :)

Perseverence is required to get those bow parts to meet with a sharp point. Similarly the scuppers /washports are a challenge...

I have been asked, "Would I use the same method for caulking again" ? My answer is YES...... but...... on the ends, I would use a hard graphite pencil..... the ink on a few of the planks on my model have bled a little.. though.... I don't feel they are too intrusive on my Robbe Atlantis Schooner.

Indeed, I am very happy with the overall result.... and its only me that has to be pleased with it !

:)

Here's a close up of the deck, showing how the Tung Oil treatment has brought the fine grain to the surface of both varieties of wood... It has a lovely "glow".. and there is still more oil to go on yet !

Wednesday, May 17, 2006

Tung at the ready ?


Before, I opened the tin, I also ordered some "tack cloths", to completely remove any traces of dust etc, essential before starting to apply the finish.

The instructions on the tin, state the first few coats should be diluted to around 50% with white spirit, this evidently assists absorption into the timber, so thats what I did.

Boy, was I pleasantly suprised !! What an improvement..... the wood, on my Robbe Atlantis, particularly the Lemonwood Gerona, takes on a fabulous " warm glow", enhancing the timbers grain beautifully.


I continued to liberally cover the deck, massaging the oil into the deck......

(rather like a massage :)

Now, following the instructions I need to wait for it to fully dry out, before adding another coat, which could take up to 4 days...though I think it will be sooner as the white spirit will act as an accelerant.

Pure Tung Oil


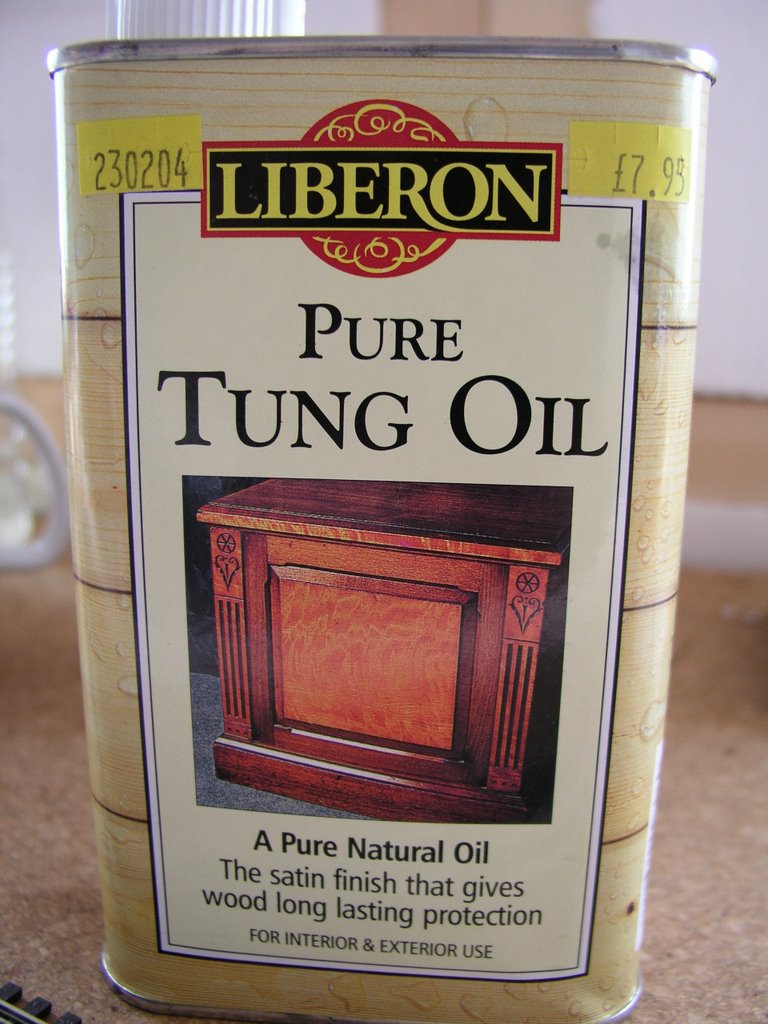
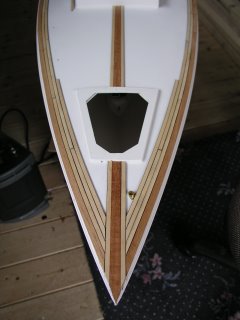
This is the finish , I am applying to my Robbe Atlantis deck timbers, as advised by my "Timber Guru" Keith Jewell. www.modellingtimbers.co.uk

A little research , has shown that is is a very, very old method of preserving, protecting and waterproofing timber.

I have "borrowed" this description from the www.


TUNG OIL HISTORY: Pure Tung Oil is a finishing product that provides a tough, flexible and highly water-resistant coating. It is classed as a drying oil along with linseed, poppy seed, safflower seed, walnut, soybean, oiticica and a few other oils. Although it is relatively new to the Western world, tung oil also known as chinawood oil has been known for centuries to the Chinese, and until this century, China was the main source for the oil. It comes from the seed of the tung trees, Aleurites fordii and Aleurites montana, deciduous trees that are very susceptible to frost damage. This vulnerability has restricted the cultivation of the tung trees to China and South America. Tung oil (china wood oil ) received wide application in China: in the building trades as a treatment for both stone and wooden structures; in marine trades as a preservative and water repellant on wooden boats. It is said to have been introduced to the West by Marco Polo. From the 13th to the 19th century, tung oil had only limited use in the West. More recently, tung oil has gained favor over linseed oil for wood finishing because it is faster drying and does not darken as much with age.


PURE TUNG OIL ADVANTAGES:
Naturally polymerizing finish
Cures by oxidation not evaporation
Does not form a glossy finish no matter the number of coats
Form a flexible water proof finish
Resists abrasion and acids
Does not blister and peel (properly applied)
Does not mold like linseed oil
Long shelf life
Does not darken with time like linseed oil
Concentrated (thin one to one, doubles the coverage)
Combined with "Citrus Solvent" makes an all natural finish
FDA approved for food contact

PROPERTIES AND CHARACTERISTICS: Pure Tung Oil is water and alkali resistant offering a protective barrier.A Pure Tung Oil finish will not darken with age as other finishes will. It resists marring, penetrates well, remains elastic and unlikely to check. Tung oil builds quickly, consolidates the wood surface and builds a transparent matte finish. Pure Tung Oil finish will not mildew or bleed like linseed oil when dry which makes it an excellent candidate for outdoor finishes. It should be kept in an airtight container with minimum air space. Pure Tung Oil contains no thinners or driers and has a light nutty odor. A Pure Tung Oil finish mixed with Citrus Solvent is a all natural organic finish that is environmentally safe and food safe.
USE: The surface should be dusted to remove all loose particles. Alternatively, you can lightly sand the first coat before applying a second. Any filling, sealing or staining must be done before the oil is applied. The first coat should be a liberal one, and you can rub it over the wood with your hand, a soft rag. Allow this application to sit for 20 minutes so the oil can soak in, then remove any excess with clean soft rags. Check after about half an hour for any seeping, and rub this off as well. Let dry completely (24-48 hours) between coats. For woods with very open pores, allow an extra 24 hours drying time.

Thinners can accelerate the drying process and greatly improve the penetration by cutting the first coat of oil with Citrus Solvent, mineral spirits or turpentine by 50%. Remember by adding mineral spirits or turpentine, Pure Tung Oil becomes toxic with these substances mixed into it, although the finish produced is not toxic because the driers evaporate.

The number of coats of oil to be applied will be determined by the intended use of the piece. Two to four coats are enough for decorative work, paneling and moulding. Surfaces that receive moderate to heavy use or handling could need up to six coats for maximum protection, plus a light renewal coat a couple of times a year. Apply till the surface reaches the saturation point. This will be evident as the surface will not absorb more oil. Renewal and building coats are quickly applied with cheese cloth, a lint free cloth or old nylon stockings. This process will give you a surface that will stand up to vigorous use and spills: water will bead on the surface.
Pure Tung Oil is recommended for wood finishing of kitchen tables, chopping blocks, counter tops, wood floors or refinishing wood floors and similar uses. Its non-toxic nature makes it particularly appropriate for children's toys and furniture. It gives good protection to wood paneling and molding.
Pure Tung Oil's matte finish will do nicely on certain pieces of furniture, but if a glossy finish is preferred you will need to buff and wax the finish, or use polymerized tung oil or a formulated tung oil based product.

Also as a Side Benefit :
We have found tung oil to be a valuable helper in the workshop. It adheres very well to metal, and a light coat rubbed onto tool steel is an effective rust inhibitor. Wooden handles will also benefit from the occasional coat.

Monday, May 15, 2006

Section 10 - The Transom

Well, the fitting of the stern brass sheet guide on my Robbe Atlantis was lots of fun ( NOT !) Lots of trial and error needed here to get the optimum bend, to allow the tube to fit thro the aft deck, then secured with Stabilit Express.

Following this, I measured..... then re-checked, then re-checked again all the dimensions before drilling all the deck holes.

Next up, the 3 deck eyes, need cutting to length, a nut, washer, pass through the deck, and add another washer and nut under neath..... ( note this is why the transom area is still OPEN !! ) You gotta get your hands in somehow ! These 3 deck eyes, are needed to assist the transom setting, when glued.

I think Robbes illustration using 1 single elastic band is a tad "optimistic" given how much the part has to be bent into position.... see the "reality " pic..... + off camera the use of two hands applying pressure till the glue sets !

I am told you could also use a hairdryer to warm assist the bending the part to shape.


When glue has set, the transom part needs trimming, filing, and sanding to shape.

I have now had a thought, I shall need to oil the deck before fitting the rest of the deck eyes /fixings..... otherwise, some area's will miss out on the oil /waterproofing !

Best laid plans.......... etc :)

Sunday, May 14, 2006

Sanding Begins

Messy job this is.... weather didn't help with raining on and off..... pushing the Robbe Atlantis in and out of the shed /workshop , I had hoped to do all the sanding outside...

However, this is the result, used my palm sander with 100 grit.... to take most of the "rough" off...... then with a block and by hand, using various grades up to 400 grit....

Its, now essentially smooth to the finger touch.....the caulking has now become more subtle, as I predicted. I do, have a few minor "issues" where the ink has bled at a few of the plank joints.
However, I am confident that these will be less obvious as the deck is finished /oiled and the deck fittings fixed in situ.

I am still very pleased with the overall effect.

An unplanned "desirable " element has crept in... the lighter Lemonwood Gerona planks, do actually vary in depth of colour, some lighter some darker...... I feel the effect has added "character " to the Robbe Atlantis decking.

Posted by Picasa

Saturday, May 13, 2006

All Planked Up !


Today, I got to lay the last plank on my Robbe Atlantis Schooner :)

I am very happy with the result, not perfect, but aesthetically pleasing to me....and thats who has to be most happy !

I feel the fine timbers supplied by Keith, have really added something to the model.

Tomorrow, will see the start of the sanding process......and no doubt lots of dust !

Not bad for a weeks solid work, but much quicker than I had anticipated...

Oh yes, and here are the stats.......I used >
54 linear metres of Lemonwood Gerona, 250mm x 5mm x1.5
3 linear metres of Honduran Mahogany 500mm x 7.5mm x1.5
1.5 linear mtrs of Honduran Mahogany 10mm x 1.5
And the Cost ? Around £40 GBP, I think it was worth it

Friday, May 12, 2006

Stern on

A half day off work, allowed me to continue the planking.... another 3 hour session, this is as much as I can manage in each sitting :)

I must admit, the progress has suprised me, far quicker than I had imagined.

With luck tomorrow will complete the midships, then the sanding will begin....... bring on the dust !!


 Posted by Picasa

Thursday, May 11, 2006

Just a reminder !


This is a reminder to just how good ( & big) this Robbe Atlantis Schooner model really is, when finished.

Credit for photos is in the links section of my Robbe Atlantis Resource Centre website.

Thanks to all those that continue to inspire me with this project :)


Posted by Picasa

Bow almost complete


Another 3 hours with my planks :) on my Robbe Atlantis Schooner, and this is the result thus far.

Midships and stern to complete, a little trimming and tidying up, then out with the sander.... and make lots of dust !

Hopefully have the majority of the deck planking completed by the weekend.......


Posted by Picasa

Wednesday, May 10, 2006

Worn Out !

Another 3 hours planking on the Robbe Atlantis this evening, and I have worn out the 4th blade on the guillotine , and the cutting bed...... Thoughtfully, ( I didnt know this ) but Proops have supplied a spare cutting bed underneath the tool.. excellent.....

One of my best tool investments ,a very "essential" bit of kit for planking... at £7.99 it was a bargain. The Amati version is a much better built than this "cheapo", but it does cost £25 !
This cheaper tool is , however , equally fit for the purpose :)


And now the result, after a further 3 hours "plonking" with planks.... today... The guillotine is definately worth its weight on this project.

I am glad I ordered excess timbers too, finding that I can "waste" up to 4 strips to get just one accurate spliced strip to fit to the inner part of the deck, the curves really make measuring an cutting accurately , somewhat difficult !

I have made mistakes, it is not perfect, but I am generally very happy with the results, and when it's finished, sanded and oiled, I think it will look a treat..... We shall see :)


Posted by Picasa

Tuesday, May 09, 2006

........and so we continue.........

Just completed another 3 hour "shift" on the Robbe Atlantis planking . I must be improving my technique, as I am getting much less superglue on my finger tips :)

Also I seem to have hit a speedy patch, with fewer planks required , the closer I get to the centre of the hull. Though now every plank needs trimming to length.

My modellers guillotine has really come into play now, one of my better tool "investments"
This is a view from the stern of the Robbe Atlantis, I am very pleased with the progress and the visual appearance of the high quality timbers, I am using.

Posted by Picasa

Robbe Delivers !

Posted by Picasa
On my return home from work this evening, a pleasant suprise, a parcel with a Robbe label on !
Whilst I have had no correspondence regarding my original complaint of the die cut veneer sheet, they have sent me a brand new replacement FOC.

Excellent service ! Robbe Delivered!
Robbe Done Good !
Many thanks to those concerned.

Sunday, May 07, 2006

Another 6 hours later


a few more planks laid to rest on my Robbe Atlantis deck :)

The planking pattern is just for aesthetics, I like it, so thats how it is !

I have tried to get the plank joints symmetrical on both sides,for the most part I have suceeded.

Certainly I do feel it will look better than the Robbe original.
( Thats my personal opinion, but I am biased :)

Some errors made, where the glue set before I had time to ease the plank into position,( should have taken Taylors advice and used Slo Zap) I used what I had available, Medium cyano, but to be honest it does dry a little too fast, and occasionally the result is not whats required !

This necessitates, sliding a sharp blade under the "errant"plank, and ease it back off the hull, clean up the area, and start again !

I still haven't found a way of not getting the horrible stuff on my finger tips, and subsequent loss of my fingerprints :)

Again, I am pleased with the progress and the effect, once the deck is completed and sanded smooth, the "caulking" will also appear more subtle, than it looks at the moment.


Had enough for this weekend,having a rest now !

Saturday, May 06, 2006

Let us begin


Today, I made a start on the Robbe Atlantis deck planking.

Began by using my palm sander to sand the gloss off the hulls deck, to provide a "key" for the adhesive.

As stated earlier in this diary, I have decided not to use the Robbe Atlantis kit spruce planks as provided, instead I opted for some high quality timbers bespoke cut by Keith Jewel of Modelling Timbers. http://www.modellingtimbers.co.uk/4520.html

I am using, Honduran mahogany 10mm wide for the King plank, with 7.5 mm outer planks of the same timber.This is a lovely timber, very warm colour and fine grained.
The main deck infill timber is "Lemonwood" a real high quality timber with the same qualities of the mahogany. These are the same width as Robbe originals 5mm.


The deck planking scheme, may not be prototypical, but what the heck, its my Schooner and I like it :)

My good friend Taylor Sparks http://www.sparksstudios.com/boatyard/atlantis.htm did mention I would lose my fingerprints ! He was right, the tips are now hardened with dry superglue :)

The caulking between the planks is simply permanent marker, my earlier research proved this was an easier method to achieve the individual planked effect, I desired.

( Sorry Keith, I know its not what you advised, but it works for me)

What you see here is about 6 -7 hours continuous effort from today !
I am reasonably happy with the progress and the effect and contrast between the timbers is spot on.

One of my other "essentials" that really worked well today, was the modelling guillotine.. far more accurate and cleaner cuts than I could ever make by hand..!

Friday, May 05, 2006

Preparation for Decking

A few "essentials" purchased today, in readiness for the deck planking stage.


The turntable, I felt was truly an essential, the ability to be able to rotate the hull when laying the alternate planking is a necessity..... saves me moving to each side alternately !

Finally, having had experience of just how "hard" hardwood really is..... ( I recall the effort when I built an Amati Riva Aquarama! ) I thought I'd invest in a palm sander..... I trust it will give me a smoother finish than if I used a manual sanding block !

With luck, I hope to start the planking this weekend..... more when I do ! :)

By the way, after 1 week, I have had no response from Robbe concerning my complaint about the veneer quality, hopefully next week will bring a result ?

Monday, May 01, 2006

Typical UK Bank Holiday !

May 1st here in UK , a bank holiday Monday = a holiday for a lot of us .

It rained, and it rained.... oh well..... we're used it :)

Not much progress made today, managed to get a base coat of white primer on the ships dinghy, between the showers, then started preparations on the BIG hull in readiness for the deck planking.

I have invested in a small turntable, that will take 100kilo weight and allow me to rotate the Atlantis hull, when I start planking the deck.

That said..... I do wish someone had told me to leave installing the keel weight till after the deck planking and the hull had been painted !!